Plumbing News and Tips for Homeowners in the Raleigh NC Area, New Product Reviews, Water Heaters and Tankless water heater advice from local certified plumbers.
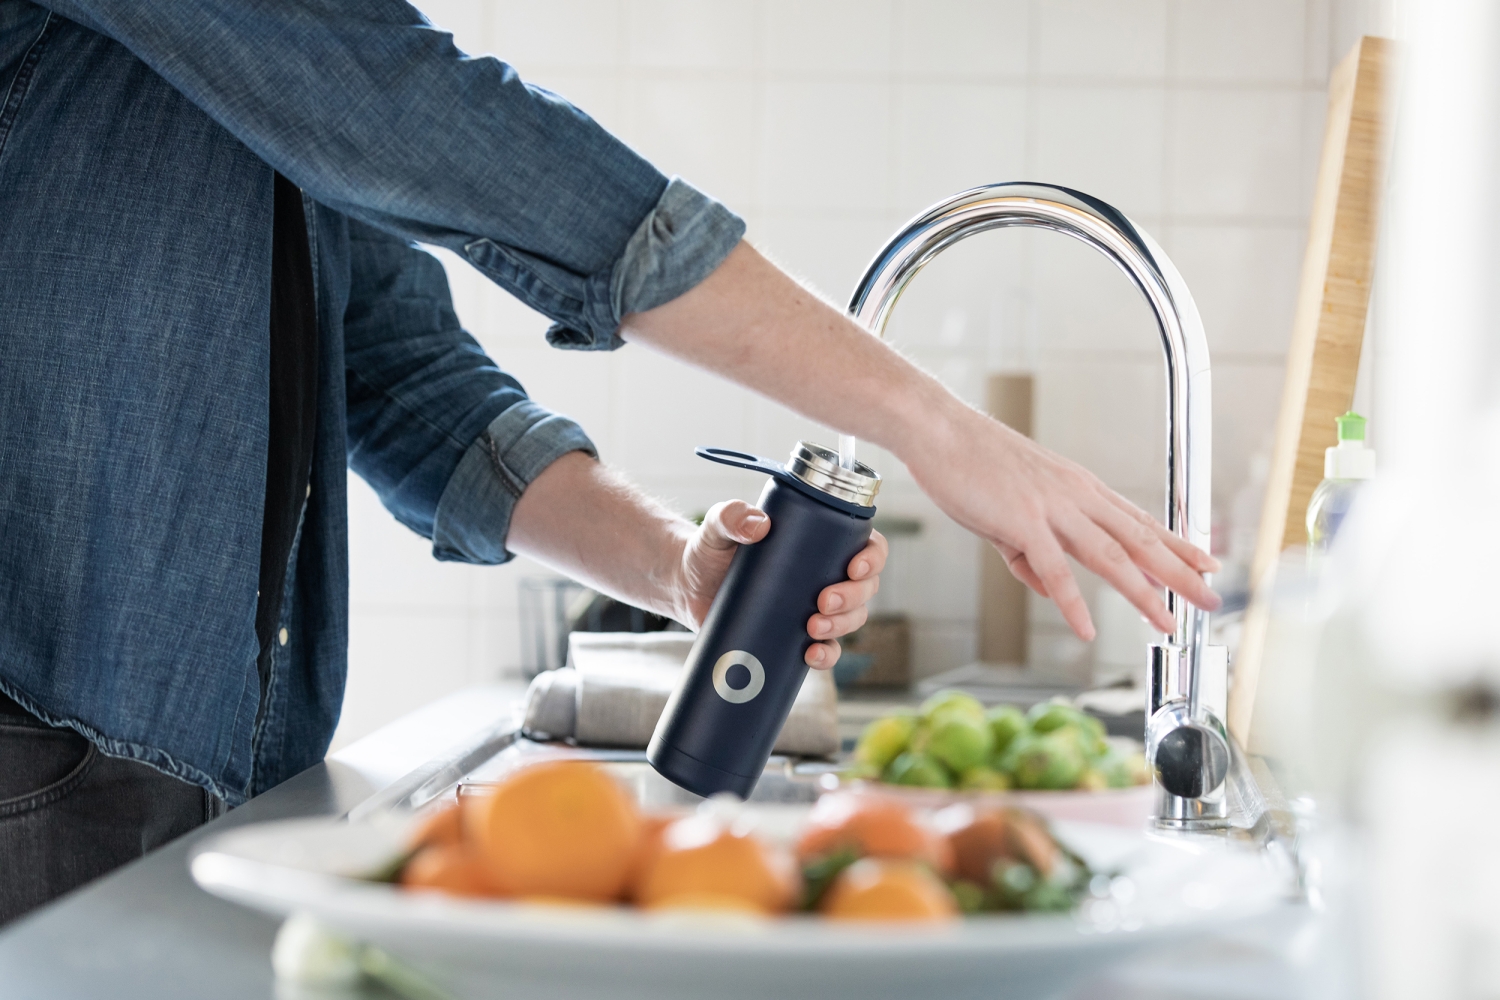
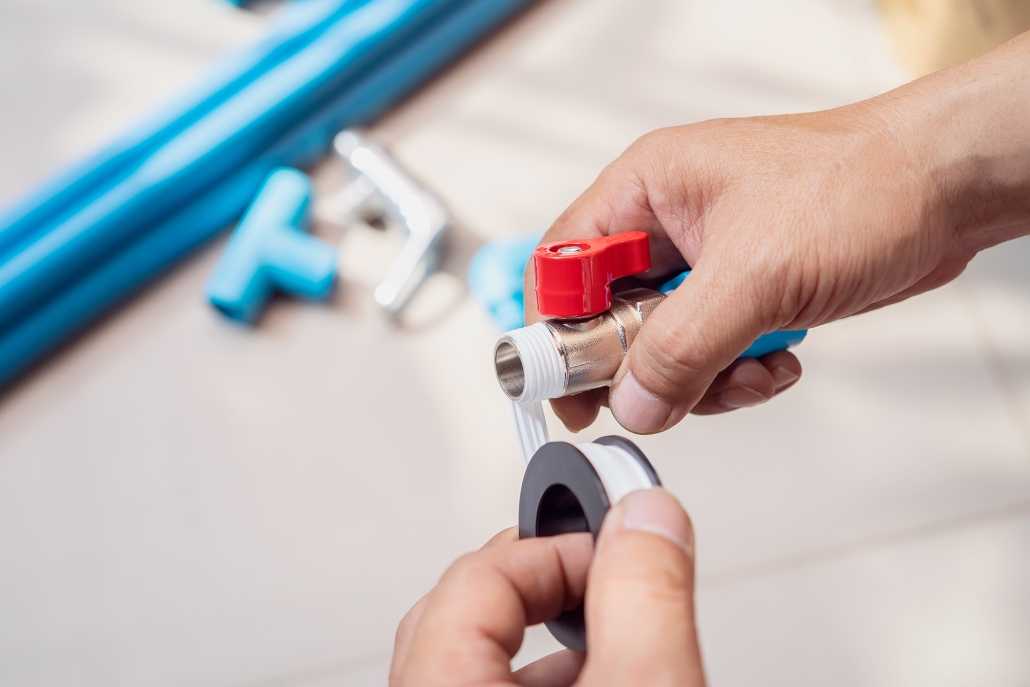
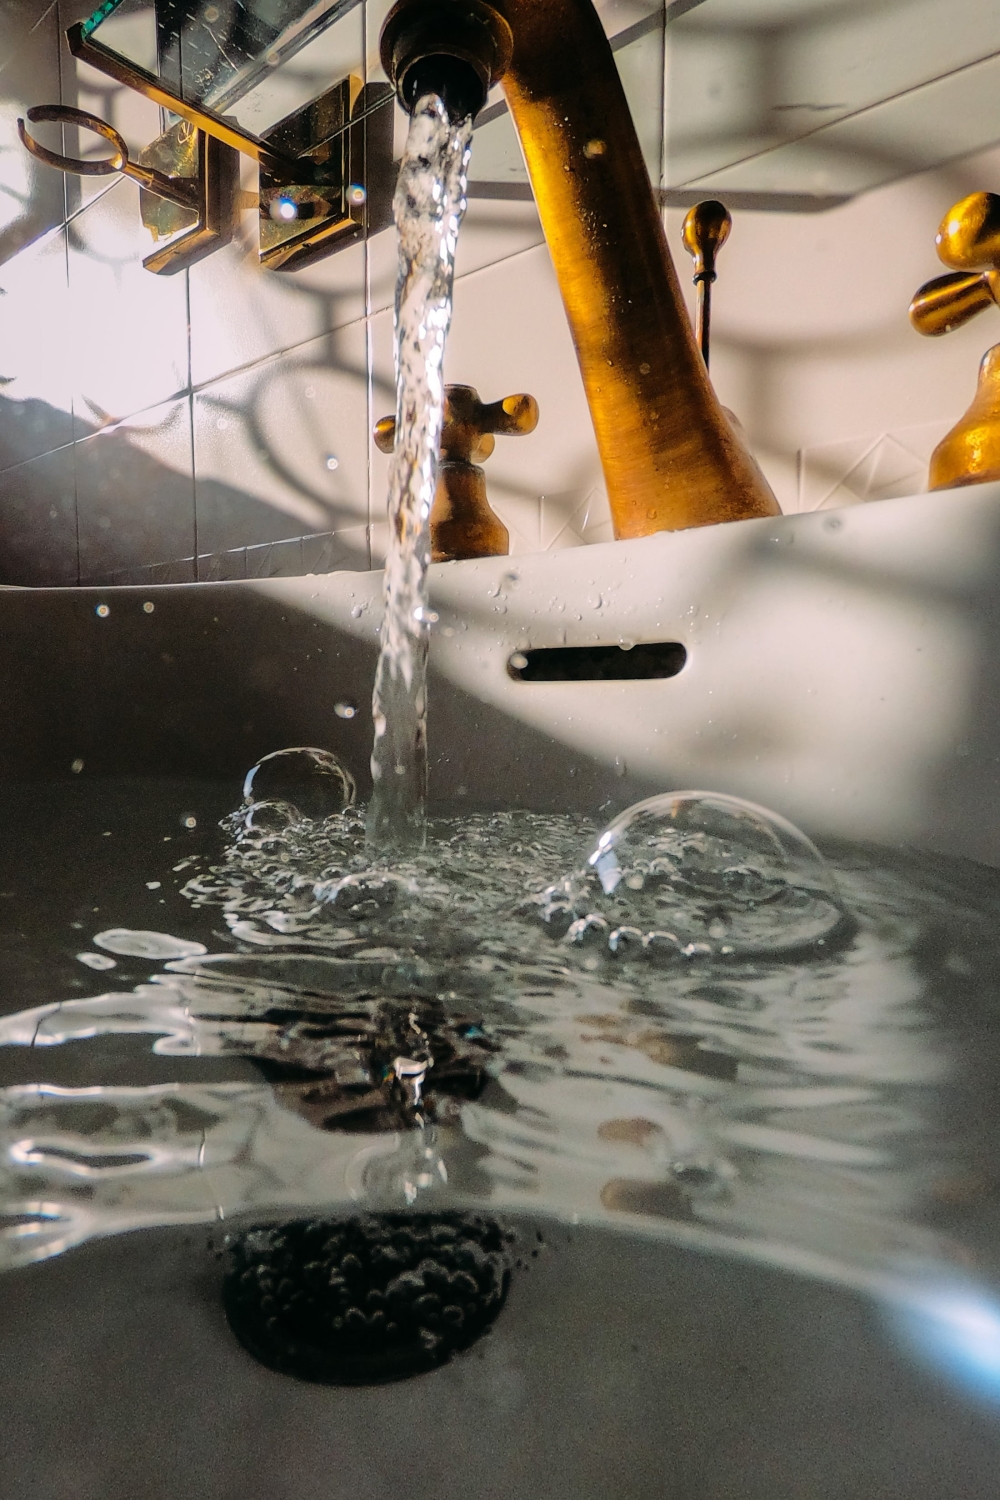
What Every Homeowner Should Know About Plumbing Maintenance. Plumbing maintenance is an essential part of home ownership. Neglecting proper plumbing upkeep can lead to several costly problems that can be difficult and expensive to repair. Homeowners need to know the basics of plumbing maintenance to protect their homes and wallet from avoidable damages.
The first step of plumbing maintenance is prevention. Preventive measures such as cleaning drains, removing debris from gutters, and checking pipes regularly are important ways to avoid common clogs, leaks, and other damage. Homeowners should also be aware of water pressure levels in their homes, as high water pressure can cause pipe damage over time.
Homeowners need to understand the different types of materials used in plumbing systems, too. Various pipework will have different thresholds for temperature, pressure, and chemical composition – all things which must be considered when performing maintenance on plumbing systems. For example, brass fittings can corrode with exposure to chlorine over time; steel piping must be protected against corrosion; PVC piping should not come into contact with temperatures above 140°F; copper piping is vulnerable to pinhole leaks if exposed to acidic water; galvanized pipes may need replacing after as little as 15 years due to rusting; and PEX tubing needs protection from UV light exposure if it’s installed outdoors. Knowing the type of material used in your plumbing system is vital for proper maintenance protocols.
When performing repairs or replacements on a home’s plumbing system, they must be done correctly so there are no leaks or compromised seals that could cause further problems. It’s best practice for DIYers trying their hand at repairs or replacements themselves to consult with a qualified plumber beforehand, so they understand the steps required for a successful job.
Finally, homeowners should know that some fixtures may require replacement over time due to wear-and-tear or outdated technology. Toilets older than 15 years old use significantly more water than modern models do and should be replaced if possible; showerheads also become clogged or corroded over time, requiring periodic replacement; faucets may eventually start leaking or become stuck due to hard mineral deposits or corrosion build-up inside the aerator screen; old valves may leak due to worn parts needing replacement; and tankless water heaters may need descaling every 2-3 years depending on local conditions like the hardness of tap water (mineral deposits) in the area they’re located in. Keeping track of components in our homes that require regular maintenance is one way to ensure our homes remain safe and efficient throughout the year – saving money and protecting against unnecessary damages over time!
https://www.poolesplumbing.com/wp-content/uploads/What-Every-Homeowner-Should-Know-About-Plumbing-Maintenance.jpg12972200raleigh plumbershttps://www.poolesplumbing.com/assets/Pooles-logos_01_small.pngraleigh plumbers2023-02-07 10:14:462023-02-07 10:14:48What Every Homeowner Should Know About Plumbing Maintenance
Why you should always hire a licensed plumber! There are many reasons you should always put into high consideration to hire a licensed plumber. First and foremost, licensed plumbers must adhere to strict safety standards when performing any work. This means that you can rest assured that your home and family are safe when a licensed professional is working on your plumbing. Additionally, licensed plumbers must keep up with the latest advancements to provide the best possible service.
This means that you can trust that a licensed plumber will have the knowledge and experience necessary to properly assess and resolve any plumbing issue you may be facing. Hiring a licensed plumber also provides peace of mind in knowing that should something go wrong, you have recourse through their licensing board. For all these reasons and more, it’s always best to hire a licensed professional when dealing with any plumbing issue.
Licensed plumbers undergo rigorous training and exams to ensure their knowledge is up-to-date to safely and effectively perform plumbing services. In addition, if you hire a licensed plumber, you have protection from potential errors or malfunctions.
A licensed professional will be held accountable for their work, meaning if something goes wrong with the service provided, you have legal recourse to get it fixed or compensated for.
Finally, hiring a licensed plumber also provides peace of mind that the job was completed correctly and efficiently the first time around – saving you time, money and hassle.
All these factors combine to make it essential to hire a licensed professional when dealing with plumbing issues.
To become a licensed plumber, individuals must undergo comprehensive training and examinations. Training typically involves a combination of classroom learning and in-person apprenticeships under existing professionals, during which they learn the fundamentals of plumbing installation and repair. They must also pass licensing exams administered by their state or local government.
These exams will test an individual’s knowledge of complex concepts such as mathematics, piping systems, electrical wiring, and much more. Once all the requirements have been met, an individual can be officially certified as a qualified plumber.
There is a wide range of plumbing jobs that require the expertise of a professional. These include installing and maintaining water, sewer, and gas pipes and repairing fixtures such as toilets, sinks, and faucets.
A professional plumber is also necessary for addressing any issues with the drainage system, and they can diagnose potential problems before they become expensive repairs.
Professionals are highly recommended for more complex tasks such as replacing or relocating existing piping systems, replacing expired fixtures or installing new plumbing appliances. For all these reasons and more, it is always best to hire a licensed professional when dealing with any plumbing-related job.
For all licensed plumbing needs, contact Raleigh’s most trusted plumber at Poole’s Plumbing.
https://www.poolesplumbing.com/wp-content/uploads/why-you-should-always-hire-a-licensed-plumber.jpeg12202500raleigh plumbershttps://www.poolesplumbing.com/assets/Pooles-logos_01_small.pngraleigh plumbers2023-01-26 08:14:002023-01-23 20:15:12Why you should always hire a licensed plumber!
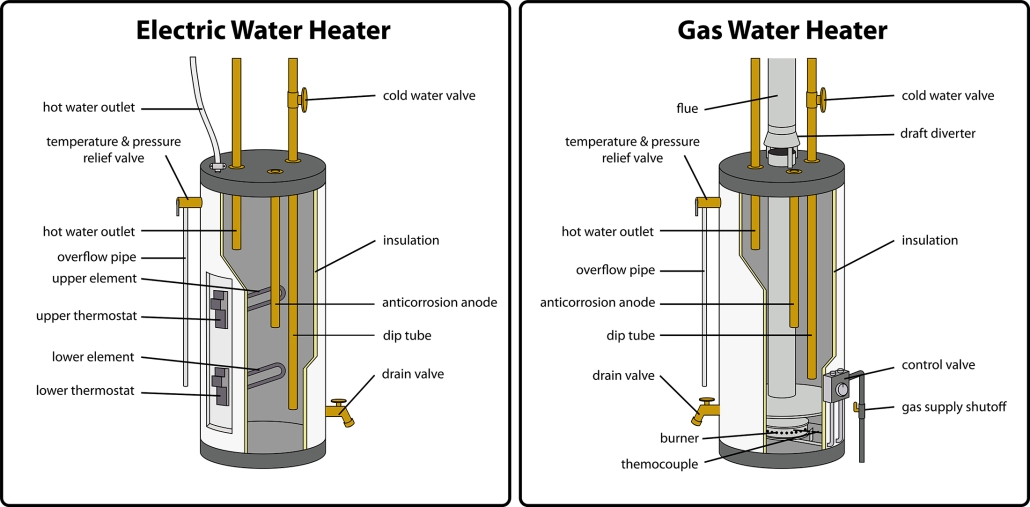
Choosing the right water heater for your home. Water heaters are one of the essential appliances in your home. They provide hot water for showers, washing dishes and clothes, and can even heat your home. However, with so many options, types, and sizes of water heaters, it can be challenging to know which one is right for you.
There’s more to owning a water heater than just heating water. Whether you’re thinking about buying a new one or already have one in your home, it’s essential to know the ins and outs of these appliances.
What you need to know about water heaters:
–How they work: Water heaters use electricity or gas to heat and store it in a tank. The tank size will determine how much hot water you have on hand at any given time.
–What they cost: Water heaters can range from around $300 to $1,500. The price will depend on the unit’s type and size, the fuel it uses, and any special features it has.
–How to choose the right one: When choosing a water heater, you’ll need to decide on the size, fuel type, and any special features you want. You’ll also need to consider your climate and how much hot water you typically use.
–How to maintain them: Water heaters should be flushed out every six months to remove sediment build-up. This will help extend the unit’s life and ensure it works properly. You’ll also need to occasionally check the anode rod and replace it, if necessary.
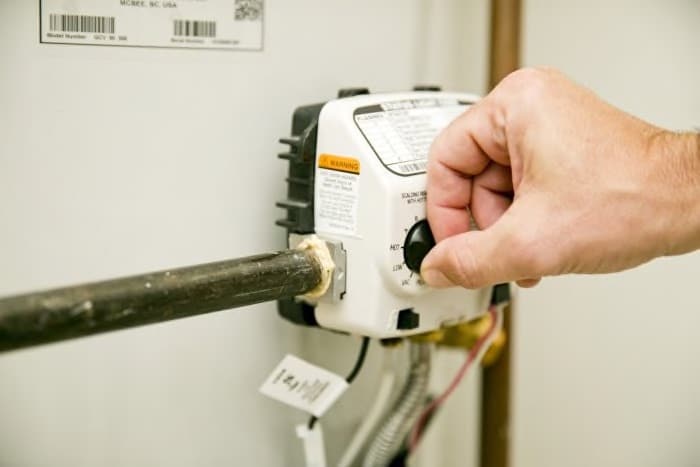
-If your water heater’s pilot light has gone out, you’ll need to relight it. Here are a few steps to take to get your pilot light burning again:
First, locate the pilot light assembly on your water heater. This is usually located near the bottom of the unit. Once you’ve found it, turn off the gas supply to the team. Then, use a flashlight to inspect the area around the pilot light for debris or blockages.
Next, use a small wire brush to clean off the tip of the pilot light assembly. Once that’s done, turn on the gas and use a long lighter to ignite the pilot light. Hold the flame close to the opening for at least 30 seconds before releasing it.
If the pilot light doesn’t stay lit, you may need to adjust the flame. To do this, turn the knob that controls the gas flow to the “low” setting and relight the pilot light. Once it’s lit, slowly turn the knob back to the “high” setting.
Here is a guide to the different types of water heaters and what you need to know before you buy one.
The storage water heater is the most common type of water heater. This type of water heater will store hot water in a tank and then uses a heating element to keep the water hot. Storage water heaters come in various sizes, so they can be used in homes of all sizes.
Another type of water heater is the tankless water heater. This type of water heater does not store hot water in a tank. Instead, it heats water on demand, so you only use energy when you need hot water. Tankless water heaters are becoming increasingly popular because they are more efficient than storage water heaters.
3. Solar Water Heaters
Solar water heaters are sustainable by using the sun’s energy to heat water. They are a more environmentally friendly option than other types of water heaters and can save you money on your energy bills. However, solar water heaters require a sunny location and can be expensive to install.
4. Heat Pump Water Heaters
Heat pump water heaters will use electricity to move heat from one place to another. This type of water heater is more efficient than other water heaters and can save you money on energy bills. However, heat pump water heaters require a well-insulated space and can be expensive to install.
Understanding water heaters allow you to choose the right one for your home and budget. And by taking good care of it, you can enjoy many years of hot water.
For more information, contact Raleigh’s most trusted plumber at www.poolesplumbing.com.
https://www.poolesplumbing.com/wp-content/uploads/Choosing-the-right-water-heater-for-your-home.jpg12772200raleigh plumbershttps://www.poolesplumbing.com/assets/Pooles-logos_01_small.pngraleigh plumbers2023-01-23 15:27:042023-01-23 15:37:29Choosing the right water heater for your home
How to Maintain Your Plumbing During the Coldest Months of Winter. January is often a time of new beginnings and resolutions as a new year starts. It can also be a chilly month, with winter weather in full swing as temperatures often dip below freezing. This may create issues for some plumbing systems, so if you are experiencing any problems, taking the necessary steps to prevent or address the case may be essential.
January is typical for plumbing issues, as colder temperatures can most definitely cause pipes to freeze or burst. Unfortunately, this can be expensive to fix and result in extensive damage, making it crucial to be aware of the potential risks during this month.
When a pipe freezes, water pressure increases, leading to a build-up of pressure that can eventually crack or burst the pipe. This can cause significant damage to the home and require expensive repairs.
To help mitigate the risk of water damage from frozen or burst pipes, you should take preventative measures such as insulating exposed pipes and setting your thermostat at 65 degrees or higher when you won’t be home for extended periods.
Additionally, identify and repair any leaking faucets or toilets before the winter months approach. Knowing how to shut off your home’s main water valve is also a must so you can quickly turn off the water supply if necessary.
Winter months can be tough on plumbing systems, but there are numerous products available to help protect and maintain them. Insulation is one of the essential items that should be used to protect pipes from freezing. Pipe sleeves, wraps, and covers will keep your lines from becoming too cold, and insulated faucet covers can prevent outdoor faucets from freezing. Additionally, installing a hot water recirculation pump may help reduce pipe-freezing problems, as it circulates already-hot water through the system when the outside temperature drops. Finally, consider investing in a submersible heater for home ponds or other water features to keep them running smoothly even in the coldest winter months. Always when in doubt, call your trusted plumber.
Homeowners can ensure their plumbing systems stay safe this winter season with all these products and techniques!
https://www.poolesplumbing.com/wp-content/uploads/How-to-Maintain-Your-Plumbing-During-the-Coldest-Months-of-Winter.jpeg13682200raleigh plumbershttps://www.poolesplumbing.com/assets/Pooles-logos_01_small.pngraleigh plumbers2023-01-18 14:26:022023-01-18 14:26:04How to Maintain Your Plumbing During the Coldest Months of Winter
Did you know that the first recorded use of the word “plumber” was in 1469?
The Latin word for lead “plumbum.” This is where the term originates.
It was in the early 1800s that plumbing became a more common profession.
Plumbers are responsible for installing and maintaining pipes and fixtures in homes and businesses. They also repair and replace plumbing fixtures when they break.
Here are ten things you probably never knew about plumbers:
10 things you didn’t know about plumbers.If you think you know everything there is to know about plumbers, think again! These skilled professionals are responsible for keeping our homes and businesses safe, clean, and healthy – and they do it all while dealing with some pretty gross stuff. Here are ten things you probably never knew about plumbers:
1. Plumbers have to be able to withstand some pretty powerful smells.
2. They also have to be able to work in very tight spaces.
3. Plumbers must be strong enough to lift heavy pipes and fixtures.
4. They also need to use power tools safely and effectively.
5. Plumbers must know how to read blueprints and other technical drawings.
6. They also need to be able to troubleshoot problems quickly and efficiently.
7. Plumbers have to be able to work in all kinds of weather conditions.
8. They also have to be able to work long hours, often on call.
9. Plumbers need to be certified to practice their trade. Most plumbers are trained through apprenticeship programs. These programs typically last four to five years and combine on-the-job training with classroom instruction.
Plumbers must be licensed in most states. To become licensed, plumbers must pass an exam that tests their knowledge of the National Plumbing Code.
10. The median annual salary for a plumber was $51,450 in May 2019, and the job outlook for plumbers is projected to grow 4% through 2029, around the average growth rate for most occupations.
And last but not least, plumbers are genuinely unsung heroes!
Without them, our homes and businesses would be at risk for severe water damage – and that’s just the beginning. So next time you see a plumber working hard to keep your home or business running smoothly, give them a big thank you – they deserve it!
www.poolesplumbing.com
https://www.poolesplumbing.com/wp-content/uploads/plumbers.jpg15001200raleigh plumbershttps://www.poolesplumbing.com/assets/Pooles-logos_01_small.pngraleigh plumbers2022-12-27 22:19:292022-12-27 22:19:3010 things you didn’t know about plumbers
Types of water heaters explained, let’s take a look at the In’s and Out’s of Water Heaters. Water heaters are one of the essential appliances in your home. They provide hot water for showers, washing dishes and clothes, and can even be used to heat your home. But with so many different types and sizes of water heaters on the market, it can be challenging to understand and know which one is right for you.
There’s more to owning a water heater than just heating water. Whether you’re thinking about buying a new one or already have one in your home, it is essential to know the ins and outs of these appliances.
So, Here’s what you need to know about water heaters:
–How they work: Water heaters use electricity or gas to heat water and store it in a tank. The tank size will determine how much hot water you have on hand at any given time.
–What they cost: Water heaters can range from around $300 to $1,500. The price will depend on the size of the unit, the type of fuel it uses, and any special features it has.
–How to choose the right one: When choosing a water heater, you’ll need to decide on the size, fuel type, and any special features you want. You’ll also need to consider your climate and how much hot water you typically use.
–How to maintain them: Water heaters should be flushed out every six months to remove sediment build-up. This will help extend the unit’s life and ensure it works properly. You’ll also need to occasionally check the anode rod and replace it, if necessary.
-If your water heater’s pilot light has gone out, you’ll need to relight it. Here are a few steps to take to get your pilot light burning again:
First, locate the pilot light assembly on your water heater. This is usually found near the bottom of the unit. Once you’ve located it on the unit, turn off the gas. Then, use a flashlight to inspect the area around the pilot light for debris or blockages.
Next, use a small wire brush to clean off the tip of the pilot light assembly. Once that’s done, turn on the gas and use a long lighter to ignite the pilot light. Hold the flame close to the opening for at least 30 seconds before releasing it.
If the pilot light doesn’t stay lit, you may need to adjust the flame. To do this, turn the knob that controls the gas flow to the “low” setting and relight the pilot light. Once it’s lit, slowly turn the knob back to the “high” setting.
Types of water heaters explained.
Here is a small helpful guide to the different types of water heaters and what you need to know before you buy one.
The most common type of water heater that is most used is the storage water heater. The storage water heater will store hot water in a tank and then uses a heating element to keep the water hot. Storage water heaters come in various sizes so they can be used in homes of all sizes.
Another type of water heater is the tankless water heater. This type of water heater does not store hot water in a tank. Instead, it heats water on demand, so you will only use energy when you need hot water. Tankless water heaters are becoming increasingly popular because they are more efficient than storage water heaters.
3. Solar Water Heaters
Solar water heaters use the sun’s energy to heat water. They are a more environmentally friendly option than other types of water heaters and can save you money on your energy bills. However, solar water heaters require a sunny location and can be expensive to install.
4. Heat Pump Water Heaters
So, heat pump water heaters move heat from one place to another using electricity. This type of water heater is more efficient than other water heaters and can save you money on energy bills. However, heat pump water heaters require a well-insulated space and can be expensive to install.
Understanding a bit more about water heaters will allow you to choose the right one for your home and budget. And by taking good care of it, you can enjoy many years of hot water.
For more information, contact Raleigh’s most trusted plumber at www.poolesplumbing.com.
https://www.poolesplumbing.com/wp-content/uploads/bradford-white.png575804raleigh plumbershttps://www.poolesplumbing.com/assets/Pooles-logos_01_small.pngraleigh plumbers2022-12-27 22:12:472022-12-27 22:19:13Types of water heaters explained
If you’re taking a vacation or traveling for the upcoming holidays, you should take some essential plumbing steps before leaving your home. Failing to do so could result in costly repairs or even water damage.
Plumbing Tips, Let’s check out these four things you should do before going on vacation or leaving for the upcoming holiday season.
1. Shut Off the Water Supply
This is the most critical step to protect your home’s plumbing while away. By shutting off the water supply, you’ll prevent any leaks or flooding that could occur while you’re gone.
Start by finding your home’s main water shut-off valve to shut off the water supply. This is usually located near your water meter location or where the main water line enters your home. Once you’ve found the shut-off valve, turn it clockwise to close.
If you need help finding where your home’s main water shut-off valve is located, or if you think it would be challenging to find in an emergency, consider installing a shut-off valve at each of your home’s plumbing fixtures. That way, it will allow you to efficiently and quickly shut off the water supply to any institution that starts leaking while you’re away.
2. Drain the Water From Your Pipes
Another essential step to take before going on vacation is to drain the water from your pipes. This will help prevent your pipes from freezing and bursting while you’re gone.
To do this, start by turning on all the faucets in your home and flushing all the toilets. This will help get rid of any standing water in your pipes.
Once all the water has been flushed from your pipes, turn off the main water shut-off valve and open all the faucets again. This will allow any remaining water in your pipes to drain out.
3. Disconnect Your Water Heater
If you’ll be traveling away from your home or office for an extended period, disconnecting your water heater is also a good idea. This will help prevent it from overheating and potentially causing a fire while you’re away. To disconnect your water heater, start by turning off the power to the unit. The next step should be to turn off the water supply to the team and open the drain valve to allow any water inside the unit to drain.
Once all the water has been drained from your unit, you can disconnect the water and power lines. Be sure to label these lines, so you know where to reconnect them when you return home.
4. Have a Neighbor Check-In
Finally, having a neighbor or friend check in on your home while you’re away is always a good idea. They can keep an eye out for any signs of leaks or flooding and contact you if there’s an issue.
It’s also a good idea to leave them your contact information in an emergency. That way, they can reach you immediately if there’s a problem.
These simple steps can help protect your home’s plumbing while you’re away on vacation or traveling for the holidays. Be sure to take care of these things before you leave so you then, in turn, may relax and enjoy your time away without worry.
https://www.poolesplumbing.com/wp-content/uploads/Plumbing-Tips-1.jpg16722200raleigh plumbershttps://www.poolesplumbing.com/assets/Pooles-logos_01_small.pngraleigh plumbers2022-12-12 14:40:382022-12-12 14:41:54Plumbing Tips — Do not leave for vacation until you perform these tasks
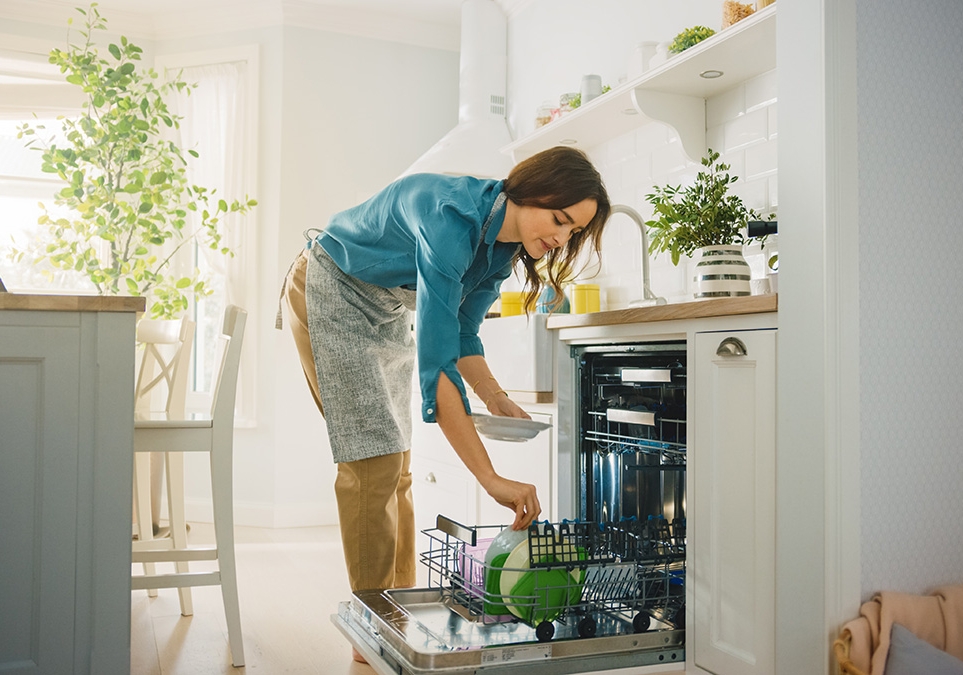
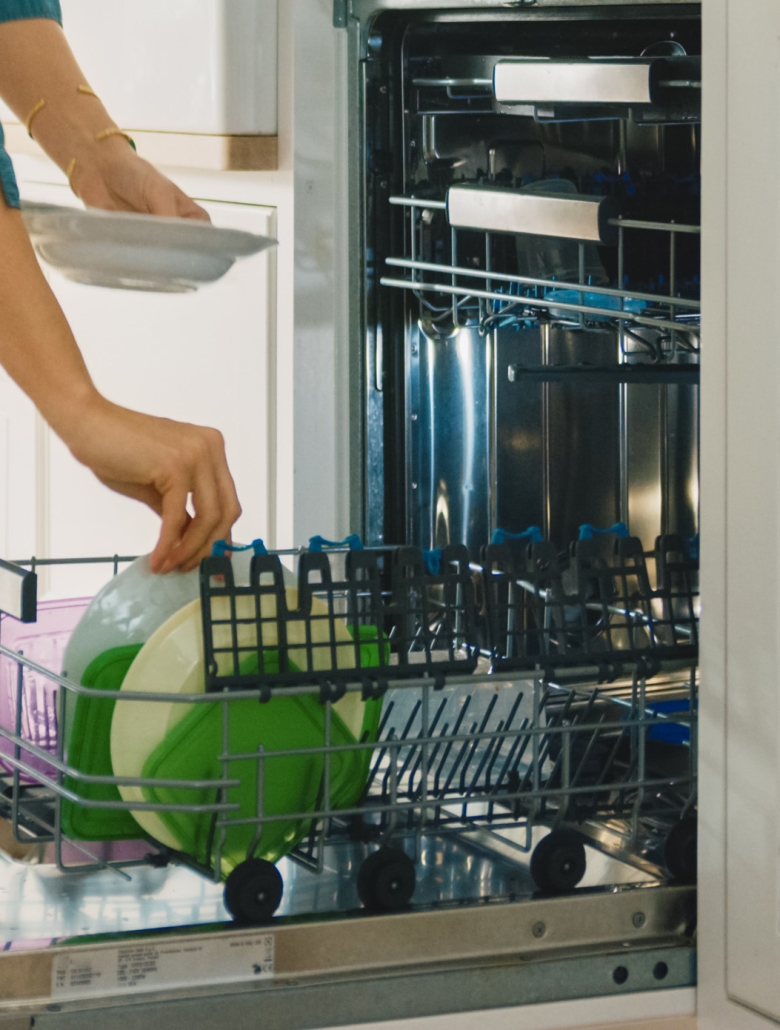
Diagnosing a clogged dishwasher, many appliances exist in today’s technologically advanced world, especially plumbing systems. One device that has been around for quite a while but once upon a time helped lessen our cleaning load in the kitchen drastically is the dishwasher. It continues to make our everyday life a bit easier, but getting used to its convenience, we sometimes panic if the machine has some issue. Typically, this is not something that can’t be identified, so there is no need to worry. Below, we will discuss the three more than likely spots to check for Common Dishwasher Clogs.
There are many ways that you can run into Common Dishwasher Clogs. Sometimes this can be as simple as a label from some container coming loose and clogging the machine. Regardless of what or how you experience these Common Dishwasher Clogs, they usually can be rectified relatively quickly and with some essential tools. Thus, when you notice a dishwasher problem, below are the three common areas it most likely will be found.
Where are the Three Most Common Dishwasher Clogs Located?
The three main areas in which you will find Common Dishwasher Clogs are the air gap, the drain hose, and the filtration system. Below, we will detail each of these areas and how and where to look for each. Likewise, we will explain how to fix the problem in each area.
1- Air Gap
If your dishwasher uses an air gap, it could be the location of your Common Dishwasher Clogs. It is located on top of your sink near the faucet. The purpose of an air gap is to allow the dishwasher to drain without waste or dirty water from the sink backing up into the machine. Obviously, from that description, you can tell that a clogged air gap could lead to problems.
To clean out Common Clogged Dishwasher in the air gap:
• Take off the cover and plastic cap on the sink to access the drain hose from the dishwasher
• Use either an air gap brush or bottle brush to clean around your drain hose
• Push the brush through the line that runs to the sink until you can see it when looking into the drain.
The drain hose attaches to the air gap or your sink and garbage disposal. If Common Dishwasher Clogs are experienced through the drain hose, below are steps to stop the problem.
• First, go to your breaker box and make sure the power to the dishwasher is shut off. So, if you also have a garbage disposal, be sure it is off.
• Shut off the water supply that runs to the dishwasher
• Place a towel with a shallow pan on top of it under your sink to catch spilling or splashing water
• Using the owner’s manual for your dishwasher, locate and then detach both ends of the drain hose
• Use a flexible brush to clean out any debris in the hose and all hose fittings, too
• Flush the drain hose with water using either a garden hose or the bathroom sink
• Reattach both ends of your drain hose
• Turn your power to these plumbing appliances back on and turn the water back on. Finally, run the dishwasher through its drain cycle (see video)
Our third and final location to look for Common Dishwasher Clogs is the filtration system. If you are unfamiliar with the filtration system, it is located under the spray arm on the bottom part of your dishwasher. With a filtration system, they can be configured differently depending on the brand or model of your dishwasher. So be sure to consult that owner’s manual (or look it up online) before cleaning it out.
If your filtration system is the issue, there is likely that a “non-food” item caused the problem. The reasoning behind assuming this is that the filtration system is good at taking care of chunks of food. Regardless of what is causing the clog, you’ll be happy to know the most advanced piece of equipment you’ll need to get rid of this clog is a screwdriver.
If you walked through all of these areas and still have Common Dishwasher Clogs, they may not be as common as initially thought. The problem could be with your garbage disposal or the sewer line. If this turns out to be, there is no need to worry. Just give us a call here at Poole’s Plumbing, and we are happy to assist with all your plumbing needs.
To contact the most trusted name in Raleigh plumbers, visit poolesplumbing.com.
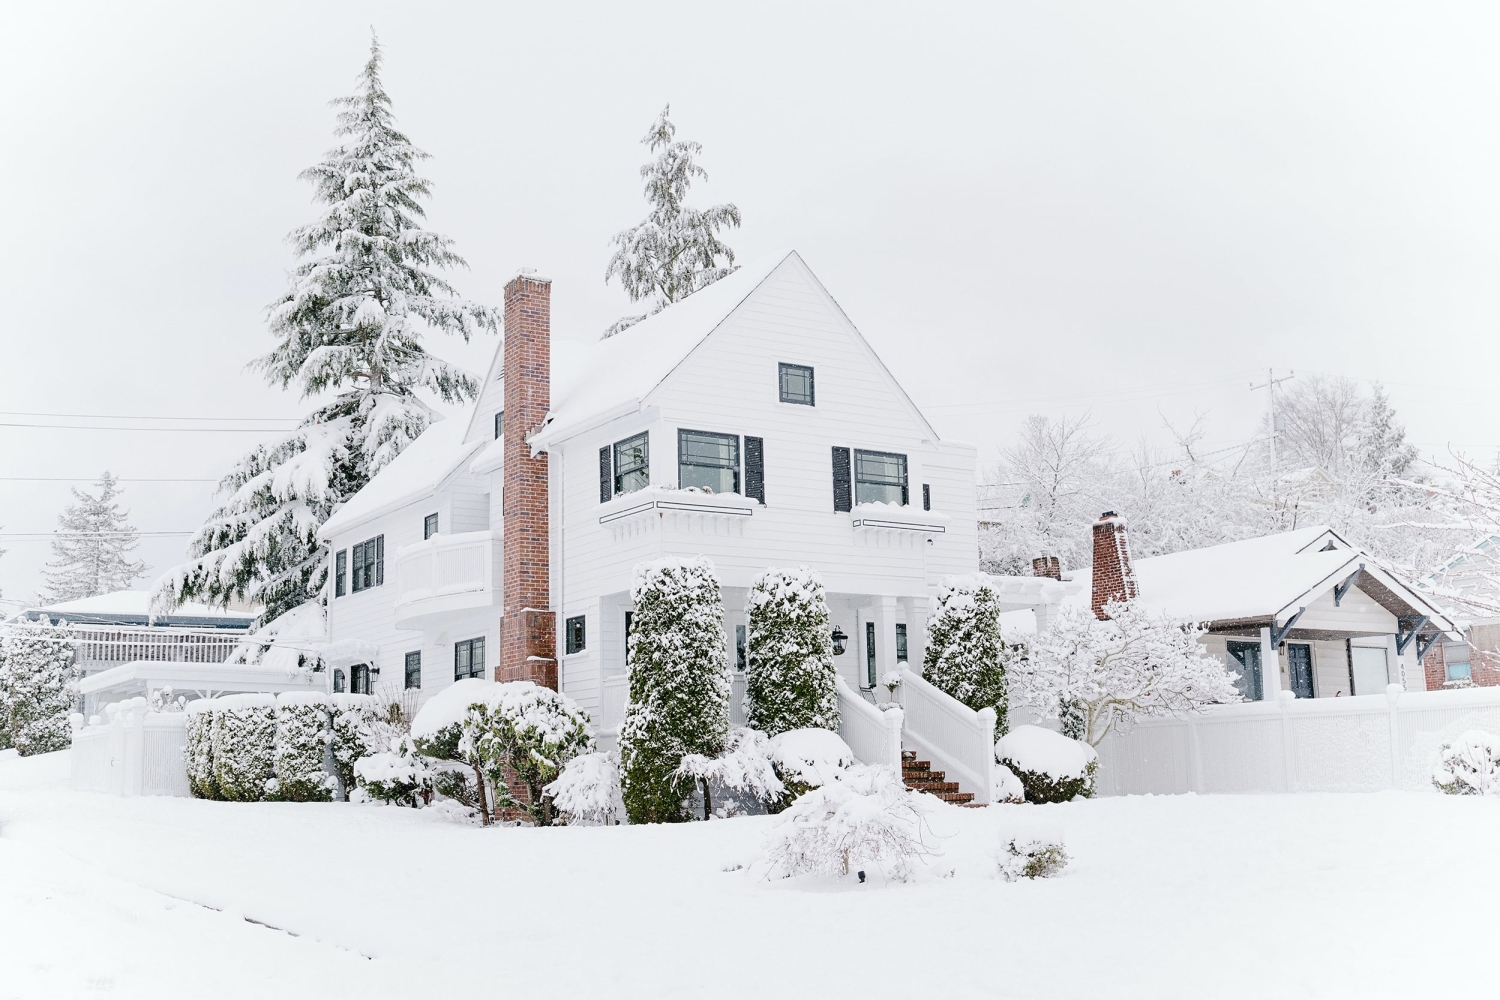
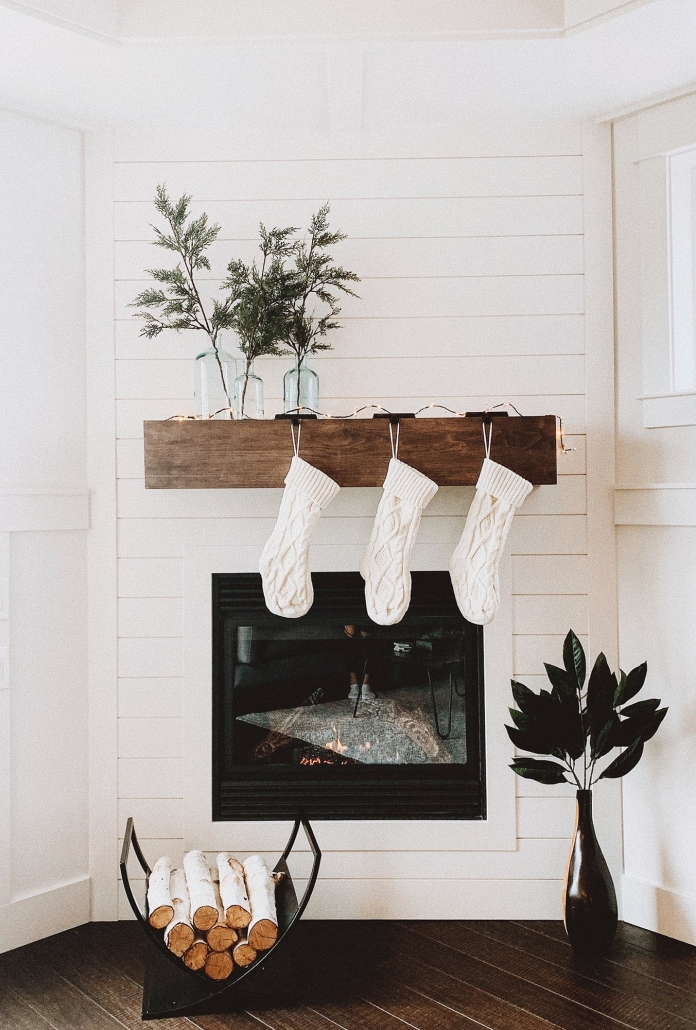
Winterize your home; Winter is Coming! Winter can be challenging for many people, but it is also a time of beauty and wonder. Take the time to appreciate the quiet beauty of a winter day, and let the hope of new beginnings fill your heart.
For centuries, people have considered the winter season a time of rebirth and new life. In the Northern Hemisphere, the winter solstice allows us to mark the shortest day of the year and the longest night. For many cultures, this is a time of celebration when the sun is reborn and the days begin to grow longer.
As winter approaches, it’s time to start thinking about preparing your home’s plumbing for the cold weather; it’s time to winterize your home.
Here are a few tips to help you winterize your home:
1. Insulate your pipes: This is one of the most important things you can do to prevent your pipes from freezing. You can buy pre-insulated pipe wraps at most hardware stores or use old towels or newspapers to wrap them yourself. Ensure no gaps or tiny spaces where cold air can seep in.
2. Let your faucets drip:This may seem like a waste of water, but it helps prevent your pipes from freezing. The constant dripping of water keeps the water moving, which prevents it from freezing and causing your pipes to burst.
3. Keep your home warm: This may seem obvious, but it’s worth mentioning. The warmer your home is, the less likely your pipes will freeze. So crank up the heat and keep your home cozy all winter long.
4. Know where your main water shut-off valve is: If your pipes do freeze and burst, it is essential to know where your main water shut-off valve is on your system so you can quickly turn off the water and prevent further damage.
5. Call a professional Plumber: If you’re not comfortable doing any of the above yourself, or if you’ve tried everything and your pipes are still freezing, it’s time to call in a professional. Plumbers have the knowledge and experience to thaw your pipes and get your plumbing system back up and running in no time.
Tips like these will help you along the way to avoid costly repairs and the headache of dealing with frozen pipes this winter. So take some time to prepare your home’s plumbing for the cold weather, and you’ll be glad you did when winter comes around.
Raleigh’s most trusted plumber is www.poolesplumbing.com.
https://www.poolesplumbing.com/wp-content/uploads/Winterize-your-home.jpg16672500raleigh plumbershttps://www.poolesplumbing.com/assets/Pooles-logos_01_small.pngraleigh plumbers2022-10-24 07:01:002022-11-27 15:13:03Winterize your home, Winter is Coming!
If your water has a reddish tint, this is likely due to rust. Rust occurs when iron in the water pipes begins to erode. Although rust is not always harmful to your health, it can be unpleasant to drink or use for cooking. If you have rusty water, you can do a few things to improve the situation.
– We first recommend that you check with your local water supplier to see if there is anything they can do. So, if the rust is coming from your water pipes, you may be able to adjust the pH of the water coming in to make it less corrosive.
– You can also try filtering your water using a pitcher filter or a faucet-mounted filter. Doing this step may not remove all the rust, but it will make the water less rusty and palatable.
– If you are on a well, you may want to have your water tested for iron levels. If there is too much iron in your water, it can be treated with a filtration system or a water softener.
– Finally, if all else fails, you can always try to improve the appearance of your water by adding a little bit of lemon juice or vinegar. This will not make the water less rusty but may make it more palatable.
Is it your pipes?
Rusty pipes are a common problem in many homes. While they may not seem a big deal, they can be pretty dangerous. Left untreated, rusty pipes can lead to severe issues like water contamination and leaks.
If you have rusty pipes in your home, you must take care of them immediately, and there are a few different ways you may do this. One option is to replace the lines. This may be expensive, but it’s usually the best option in the long run.
Another option is to try a pipe repair kit. These kits usually come with a rust-resistant coating that you can apply to the pipes. This can help to prevent further rusting and may even be able to repair some of the damage that’s already been done.
If you’re unsure how to handle rusty pipes, it’s always best to call a plumber. They can inspect the lines and advise on how to fix them. In most cases, they’ll be able to do the job right in your home.
Rusty pipes are a severe problem that should be taken care of as soon as possible. If you have them in your home or office, don’t hesitate to call a plumber or use a repair kit. With a little effort, you can keep your pipes in good condition and avoid any serious problems down the road.
Pipe repair kits can be found at most hardware stores. They usually come with everything you need to apply the rust-resistant coating. Always follow the directions carefully so you don’t damage the pipes further.
If you have questions about using a pipe repair kit or are unsure whether it’s the right solution for your problem, you can always ask a plumber. They’ll be able to help you figure out what’s best for your particular situation.
Rusty pipes are a common problem, but they don’t have to be a big deal. With a little effort, you can fix them and avoid any serious issues down the road.
https://www.poolesplumbing.com/wp-content/uploads/why-does-my-water-taste-bad.jpg16672500raleigh plumbershttps://www.poolesplumbing.com/assets/Pooles-logos_01_small.pngraleigh plumbers2022-10-21 10:27:042022-11-27 15:13:03Why does my water taste bad?
If you’ve never had to unclog a shower drain you’re lucky. Many issues can arise that almost immediately tell you there is a plumbing problem. The unmistakable sound of a dripping faucet. The noticeable wetness from a leaky toilet. More so than any “telltale” sign, regardless of the issue, though, is that undeniably funky odor coming from your shower drain. This, combined with you noticing the water level higher as you take that morning rinse, means you have probably got a drainage issue. Luckily, your friends here at Poole’s Plumbing have you covered, as below we will instruct you on how to Unclog a Shower Drain.
Now, this is not the most complicated of plumbing issues, nor is it an impossible fix. However, there are a few ways that depending on the blockage; you might need to approach to Unclog a Shower Drain. No worries, though, as we assure you above, we will run through each of these ways. In the end, one way or another, we will get rid of that smell and, most importantly, open up that blockage.
Ideally, this will be the way you Unclog a Shower Drain. Finding and removing whatever obstructs the water from passing through your drain would end the issue. These obstructions can be anything from gobs of hair, oils, soaps, or other debris. But, just removing the cover and Unclogging a Shower Drain by removal will make for a fast solution in many cases. If you can use pliers or even a gloved hand to do this, perfect, case closed, and problem solved. However, if you can see the clog but can not get at it, follow the instructions below and use a simple wire coat hanger to Unclog a Shower Drain.
Use a pair of wire cutters to cut your hanger to the right of the hook
Bend the wire until it is one long, straight wire, and the hook at the top can be used as a handle
Use a pair of needle-nosed pliers to pinch a small hook on the end of your long wire
Lower and guide your hooked wire into the shower drain until you feel some type of resistance. That resistance is your clog.
When you feel this mass, to Unclog a Shower Drain, rotate and poke the wire until you can feel it grasp the clog. Then pull it up and out of the drain. You may need to repeat this a few times to remove all debris fully.
If for some reason the hanger wire does not reach or is not strong enough to pull a clog, follow \the basic same method to Unclog a Shower Drain, but use a hand snake in the place of the wire.
Kitchen Ingredients to Combat the Clog
Now, as we said, the first way would be ideal to Unclog a Shower Drain. But we also said we know some clogs are worse than others. Likewise, people develop and have their own methods that they grow to trust. Other ways to safely Unclog a Shower Drain that have been used over the years include the use of some basic kitchen ingredients.
This way of unclogging a Shower Drain will keep your hands clean and usually are effective. Below we have three different “potions” for your shower drain that will get things flowing right again.
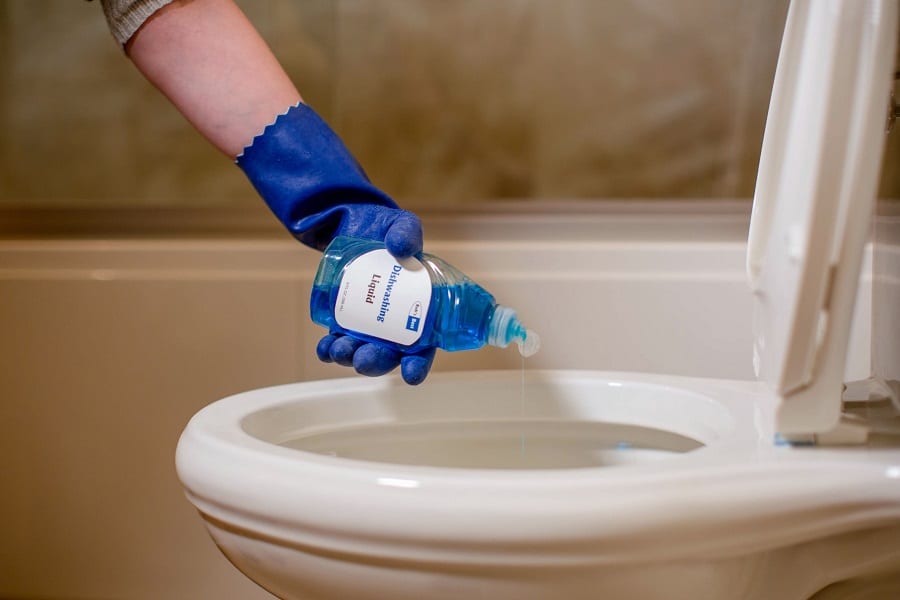
Liquid Dish Soap- Yep. That is exactly what it states. Pour between a half and a full cup of liquid dish soap directly into the shower drain. Wait 20-30 minutes, then flush through with extremely hot or even boiling water.
Baking Soda and Vinegar Combo- A safe alternative to harsh chemicals when looking to Unclog a Shower Drain. This involves first pouring one cup of baking soda into your drain. Immediately following that, pour one cup of distilled white vinegar into the same drain. Then cover the drain and again wait 20-30 minutes. At that point, flush with boiling water, and you should be successful in this attempt to Unclog a Shower Drain.
The “Fizzy Cola” Method- It is what it sounds like. No surprises here; just looking to Unclog a Shower Drain simply. To use this method, pour a liter of cola (or fizzy, carbonated soda) down the drain. Follow this with our trusty boiling water, which is said sometimes to do the trick.
What About When Already Dealing with Standing Water?
This is a valid question with a not-so-difficult-to-accomplish answer. If your clogged drain already has you with water standing as you shower, we simply start by grabbing the plunger. Placing its head over the drain, plunge up and down quickly between five and ten times. Pull away from the drain and repeat this simple process if needed. You will begin to see the standing water recede, and to Unclog a Shower Drain completely, refer to the above methods once the standing water has been cleared.
What if None of These Helps to Unclog a Shower Drain
These may seem obvious and easy ways to unclog. But the truth is, these methods are proven to work. If you try these, though, and they do not work, you may need some professional help. The most reliable name in Raleigh area plumbers, Poole’s Plumbing, is here and waiting to assist you with this or any other of your plumbing needs.
To contact the most trusted name in Raleigh plumbing for over two decades, visit poolesplumbing.com.
https://www.poolesplumbing.com/wp-content/uploads/Spring-Plumbing-Tips-Part-2-Pooles-Plumbing.jpg533800raleigh plumbershttps://www.poolesplumbing.com/assets/Pooles-logos_01_small.pngraleigh plumbers2022-10-10 11:29:152022-11-27 15:13:03Unclog a Shower Drain
So exactly, when do you need a plumbing inspection? Many individuals don’t think about their plumbing until something goes wrong. But, having a regular plumbing inspection can help prevent many problems from occurring in the first place. A plumbing inspection can help identify potential problems before they cause severe damage to your home. For example, a leaking pipe can be fixed before it causes water damage to your floor or walls. A clogged drain can be cleared before it causes sewage back into your home.
In addition to preventing damage, a plumbing inspection can also help save you money. So, fixing a small problem before it becomes a big problem can save you a lot of money in the long run.
So, schedule a plumbing inspection today if you want to protect your home and save money. So, if you own a home, you know that maintaining your plumbing is essential to keeping your home in good condition.
But what about when it’s time to buy a new home?
Or renovate your home?
How can you be sure that the plumbing is up to par?
The best way to do this is to perform a plumbing inspection. This will allow you to look closely at all the piping and fixtures in the home and identify any potential problems. Here’s how to do it:
1. Start by turning on all of the faucets in the house, both hot and cold. Turn them on and let them run for a few minutes to see if there are any leaks.
2. Check all the toilets to ensure they are flushing correctly. If you notice any leaks, make a note of them.
3. Inspect all exposed piping in the basement and in the crawl space; this way, you can look for any signs of corrosion or damage.
4. Have a professional plumber come to the home and perform a pressure test on the system. This will help identify any hidden leaks.
5. Ask the homeowner for copies of any recent plumbing maintenance or repair records. This will then give you an idea of how well the system has been cared for.
Does a new house need a plumbing inspection?
So, by following these steps, you can be sure that you’re getting a home with plumbing that is in good condition. Don’t forget to have a professional inspect the system before you finalize your purchase!
Think about all the things that rely on plumbing in your home – from flushing the toilet to taking a shower, cooking, and cleaning. Now imagine what would happen if something went wrong with your home’s plumbing system. A small leak could quickly become a big problem, and a broken pipe could cause extensive damage.
That’s why it’s essential to have your home’s plumbing inspected regularly. A professional plumber can identify and repair problems before they become significant issues. An inspection can also help you save money by catching problems early on when they are typically more accessible and less expensive to fix.
So don’t wait for a problem with your plumbing to call a professional. You can always schedule an inspection today and rest easy knowing your home’s plumbing is in good hands.
Pros:
1. You can catch problems early. Regularly inspecting your plumbing can see issues before they become big and expensive to fix.
2. You can avoid disasters. Plumbing problems can cause all sorts of disasters, from flooding your home to damaging your foundation. By getting an inspection, you can prevent these disasters.
3. You’ll know what needs to be fixed. Once your inspector finds problems with your plumbing, you’ll know exactly what needs to be fixed. This may definitely save you time and money in the long run.
Overall, having a plumbing inspection done periodically is a good idea. It can catch problems early, avoid disasters, and save you money in the long run.
https://www.poolesplumbing.com/wp-content/uploads/When-do-you-need-a-pluming-inspection.jpg16522200raleigh plumbershttps://www.poolesplumbing.com/assets/Pooles-logos_01_small.pngraleigh plumbers2022-09-28 09:48:372022-11-27 15:13:03When do you need a plumbing inspection?
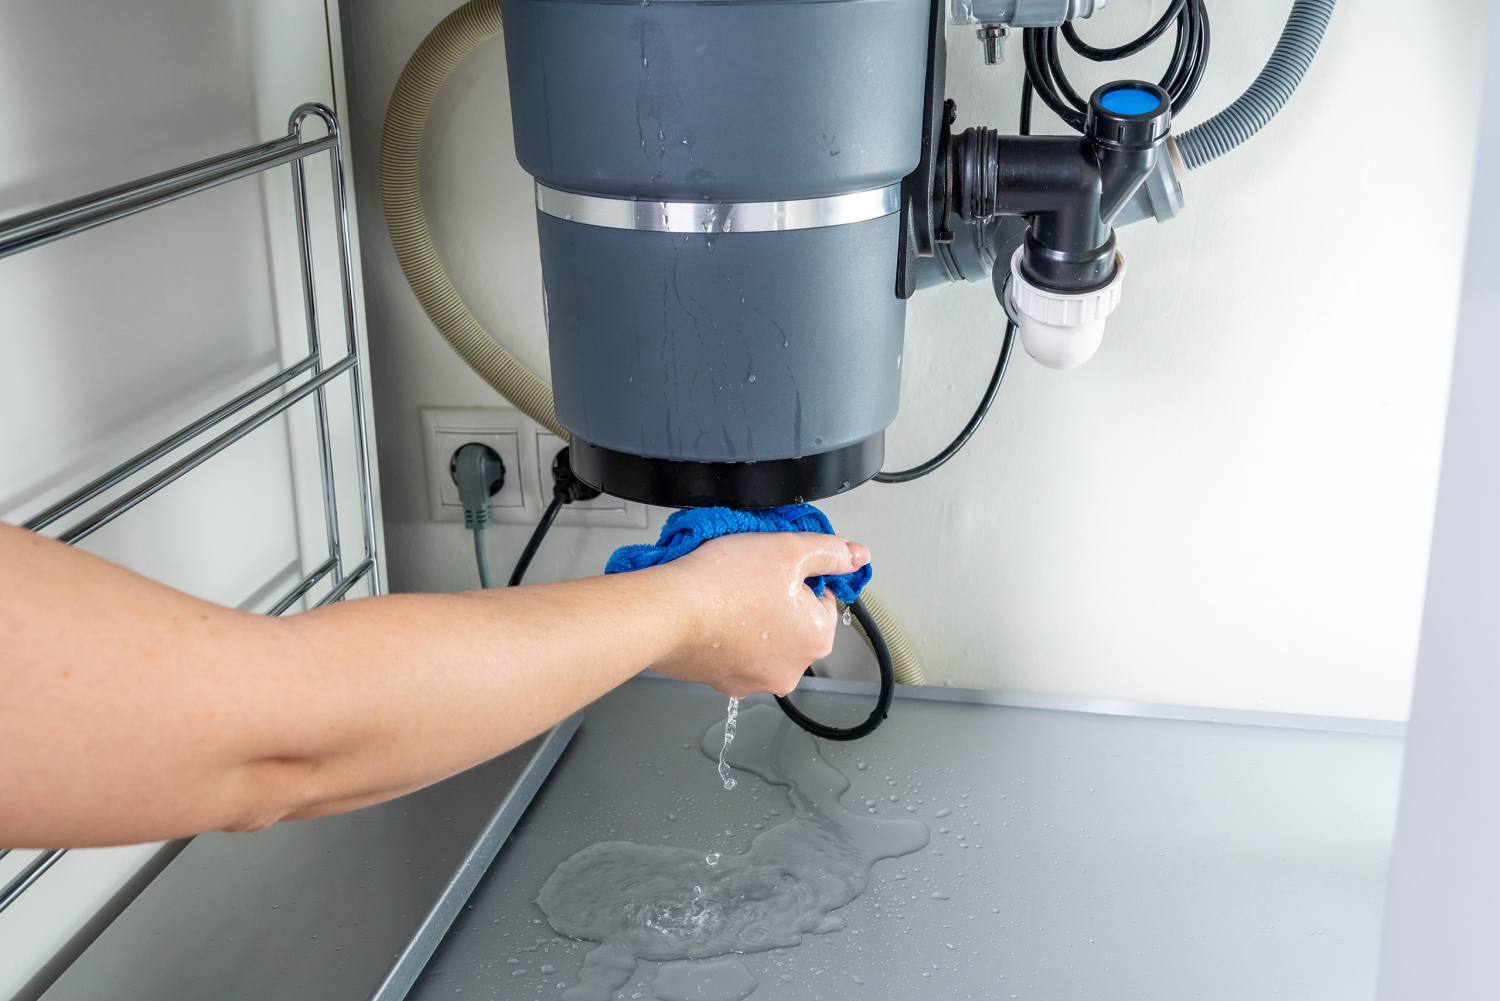
If you have a garbage disposal, chances are good that you’ve had to deal with a garbage disposal leaking issue at some point. And while a little leak might not seem like a big deal, it can be dangerous. Water and electrical appliances don’t mix well, so even a tiny amount of water can cause severe damage to your disposal (and your home).
So why exactly does a garbage disposal leak? There are a few different reasons, but the most common one is wear and tear. Over time, the seals and gaskets at your disposal can break down, allowing water to seep. This will be especially true if you use your disposal frequently or put challenging items down the drain (like bones or coffee grounds).
Another possible reason for a leak is that your disposal isn’t installed correctly. This is quite common, so it’s always a good idea to have a professional look at your disposal to ensure everything is in its proper place.
Finally, something is also possibly blocking the drain of your garbage disposal, and if this is the case, water will build up in the removal and eventually start leaking out. The best way to deal with this issue is to remove whatever is blocking the drain and run some water through the disposal to ensure everything is clear.
If you’re dealing with leaking garbage disposal, don’t panic. There are many different things you can do to fix the problem. First, try tightening the bolts that hold the removal in place. This might stop the leak, at least temporarily.
So, if that doesn’t work, you can try using some plumber’s putty to seal any cracks or gaps around the disposal. Be sure to follow the directions on the package carefully, as too much putty can cause more leaks.
So finally, if all else fails, you may need to replace your garbage disposal entirely. This is usually a last resort, but it may be necessary if your disposal is old or damaged beyond repair.
No matter what’s causing your garbage disposal to leak, it’s essential to deal with the issue as soon as possible. Water and electrical appliances don’t mix, so a small leak can cause significant damage. So, with a little bit of troubleshooting, you should be able to fix the problem and get your disposal back in working order in no time.
The garbage disposal can, at times, indeed be a nice luxury to have. Making for easier cleanup and more straightforward removal of select food waste, the convenience in some respects is undeniable. However, as with any plumbing appliance, there can be issues if the disposal performance is somehow hindered. This can lead to your Garbage Disposal Leaking.
If you find your Garbage Disposal Leaking, it could be due to multiple causes. While there could be another factor in your Garbage Disposal Leaking, we will walk you through several things to look for below. These items include where you see the Garbage Disposal Leaking, a probable cause for this, and, if possible, a remedy.
When You See the Garbage Disposal Leaking From its Top
The garbage disposal is usually connected to your sink by the flange and plumber’s putty. Garbage Disposal Leaking occurs here somewhat commonly if the connection between the sink drains and sink flange is not tight enough. The problem can also persist if the relationship between the drain and flange has become eroded over time.
Remedies When Probable Cause is Loose Sink Flange
• Check the mounting bolts connecting the drain and flange to be sure they are tight enough
• Be sure that the plumber’s putty helping seal the disposal is not compromised. If it is, loosen the bolts, add new putty, and retighten the bolts back in place
You Notice the Garbage Disposal Leaking from its Side
In many kitchens, the drain pipe from a dishwasher is connected to your garbage disposal. When functioning normally and adequately, that drain line connection removes excess food debris and water from the dishwasher into the garbage disposal. If for some reason, this pipe is obstructed or loosely connected, this can explain your Garbage Disposal Leaking.
Remedies When Probable Cause is the Drain Line Connection
• A rubber gasket and screws connect your main drain line. If the metal clamp connecting the dishwasher to the disposal is loose, tighten it with a screwdriver and say goodbye to your Garbage Disposal Leaking
• The hose connecting the dishwasher and disposal may also be the issue. Look for cracks or dried-out areas in this connection. So, if there is any damage to the hose, you can end the Garbage Disposal Leaking by getting a replacement hose.
If the Garbage Disposal Leaking is Coming from Its Bottom
One thing that can happen with almost any product or appliance is it can simply get old. Thus, the Garbage Disposal Leaking you’re seeing may result from age. In actuality, if you notice leakage just at the bottom and no drips from above, it is usually the disposal being worn out. Causing this is that internal seals deteriorate over time.
Remedies When Probable Cause is a Busted Internal Seal
• Inspect the actual body of your disposal. If you’re seeing Garbage Disposal Leakage, find cracks or wet spots to know precisely where. Again, those internal seals, if worn out, can eventually lead to these types of leaks and must be replaced
• Keep an eye out for the positioning of your garbage disposal under your sink. It may have been bumped or shifted out of place. If it has, checks the seals and putty and realign as needed to stop the Garbage Disposal from Leaking.
As you may now realize, there are various reasons you may see your Garbage Disposal Leaking. Hopefully, from our information, you can now recognize a leak and identify where it is on the disposal. Likewise, with the suggested remedies, you should be able to, in many cases, fix the problem.
If you are not comfortable fixing or feel something else is causing Garbage Disposal Leaking, give us a call.
Just visit poolesplumbing.com to contact the most trusted name in the Raleigh area, plumbers, and we’re happy to help solve all your plumbing problems.
https://www.poolesplumbing.com/wp-content/uploads/Garbage-Disposal-Leaking.jpeg17082560raleigh plumbershttps://www.poolesplumbing.com/assets/Pooles-logos_01_small.pngraleigh plumbers2022-09-23 11:16:492022-11-27 15:13:03Why is My Garbage Disposal Leaking?
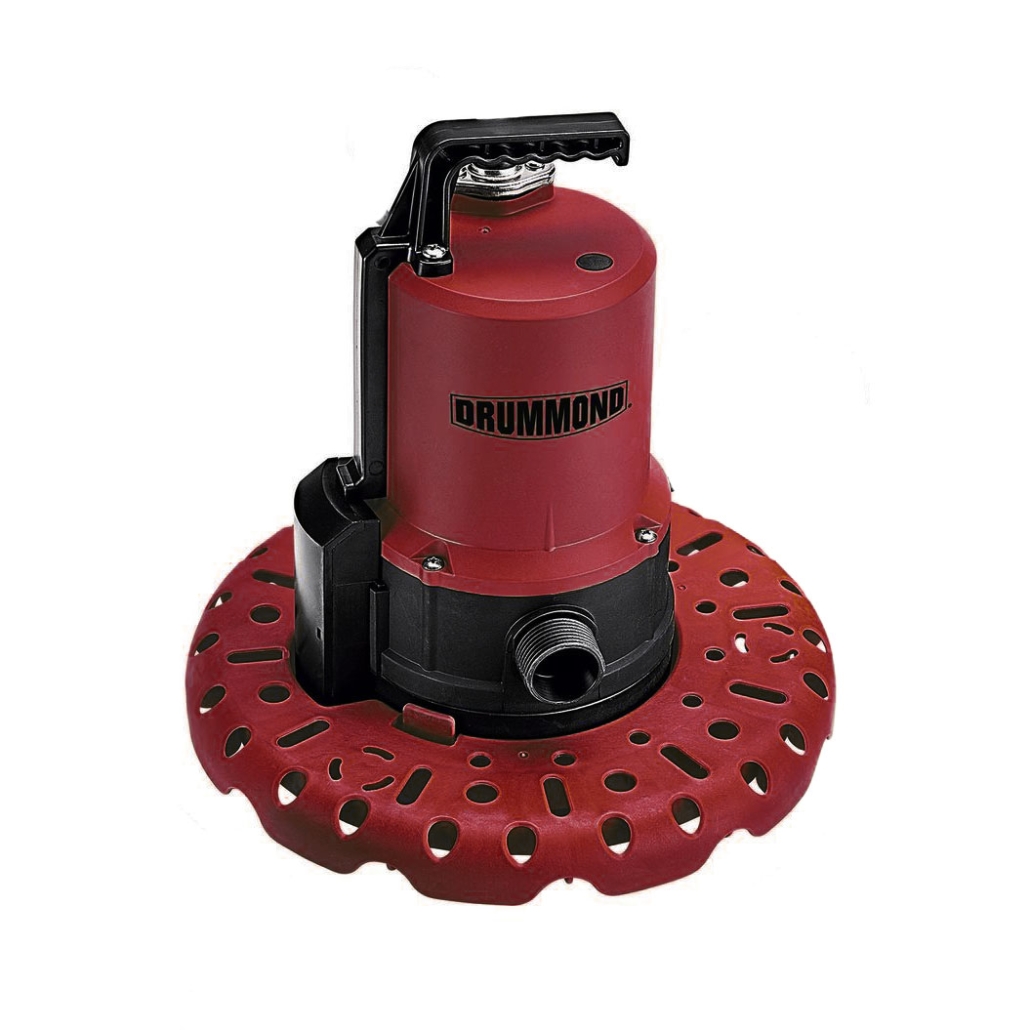
Sump pumps are one of those items that you don’t think about until you need to invest in one. And then, you’re thrilled you have one! A small sump pump is installed in the lowest part of your basement or crawlspace. Its job is to remove groundwater accumulated around your foundation and prevent it from flooding your basement or crawlspace.
While most homes have a sump pump, not all sump pumps are created equal. There are different types of sump pumps; the right one will depend on your specific needs. So, for example, if you live in an area with a high water table, you’ll need a sump pump that can handle a higher volume of water.
Sump pumps are relatively simple devices, but they can help keep your basement or crawlspace dry. If you’re unsure if you need a sump pump or which type is right for you, talk to a professional contractor specializing in waterproofing basements and crawlspaces. They can help you determine whether a sump pump is necessary for your home and which type would suit your situation.
If you have a sump pump, you know it can be a lifesaver during heavy rains or when there is a lot of water around your home. But, like any other mechanical device, sump pumps must be maintained and cleaned regularly to ensure they are working correctly. Let’s take a look at this step-by-step guide on how to clean your sump pump:
Example of a submergible pump
How to clean
For safety precautions, you will first need to start by disconnecting all the power to your pump and the area in which you work.
Next, you will want to remove the cover to the sump pit. This will give you access to the pump itself.
Using a garden hose, flush the inside of the sump pit or hole. This will allow the removal of any dirt or debris that has accumulated inside.
Once the sump pit is clean, you can now remove the pump from the hole.
Disassemble the pump so that you can access all of the different parts.
Using a soft brush, clean off all of the different parts of the sump pump. The impeller is sensitive, so ensure that you pay special attention to the impeller, as this is what helps move the water.
Once all the parts are clean, you can reassemble the sump pump and put it back into the sump pit.
Reconnect the power to your sump pump and test it to ensure it works properly.
So, following these simple steps may ensure that your sump pump is clean and working correctly. Regular maintenance will help prolong your pump’s life and keep your home safe from flooding.
https://www.poolesplumbing.com/wp-content/uploads/how-to-clean-a-sump-pump.jpg17072560raleigh plumbershttps://www.poolesplumbing.com/assets/Pooles-logos_01_small.pngraleigh plumbers2022-09-13 17:46:152022-11-27 15:13:03What is a sump pump and How do I clean it?
Autumn Plumbing Tips — Oh, the hot and humid days of summer are coming to an end, the trees are to show off soon, the leaves of changing color, the air is getting cooler, and you need to start making a list and thinking about preparing your home for the autumn season. One of the most important things you can do to prepare your home for autumn is to ensure all of your plumbing is in good working order. Here are a few tips to help you get your pipes, water heater, and sump pump ready for the autumn season:
Drain and clean your gutters. Leaves, sticks, and other debris may get stuck in and clog your gutters, which can lead to water damage to your home. So, remove all leaves and debris from your gutters before the rains begin.
Check your outdoor faucets for leaks. Autumn is the perfect season and an excellent time to check your outdoor faucets for leaks. If you find a leak, repair it before the cold weather sets in.
Insulate your pipes. Pipes can freeze and burst if they are not adequately insulated. Be sure to wrap any exposed pipes in insulation to protect them from the cold weather.
Drain and flush your water heater. Sediment may build up in your water heater over time, leading to inefficient operation and increased energy costs. Draining and flushing your water heater will remove the residue and help keep your heater running all autumn smoothly.
Test your sump pump. The sump pump is designed and built to remove water from your basement during a flood. So, test your sump pump before the rainy season begins to ensure it is working correctly.
Autumn is a great time to have your septic tank pumped and inspected. This will help prevent any problems from developing over the winter months.
Keep a check on your monthly water bill. If you notice a sudden increase in your usage, it could signify a hidden leak, so ensure leaks are repaired as soon as possible to avoid costly water damage.
Following these simple tips will help you get your plumbing ready for autumn. By taking the time to prepare your plumbing for the season, you can avoid costly repairs and may keep your home safe and comfortable all autumn long.
Autumn Plumbing Tips Plumbing Gadgets for Autumn:
As the weather gets cooler and the leaves fall, it’s time to start thinking about autumnal plumbing. A few essential gadgets can help make your plumbing system more efficient and effective this season. So, go check out just a few of the items we think and have picked as the best plumbing gadgets for autumn:
A good drain snake. A drain snake is an essential gadget and a great way to clear out any clogs that may have formed over the summer. Having one on hand is also a good idea if you experience unexpected drainage issues.
A water pressure regulator. This is a must-have for any home with a well or other private water source. A water pressure regulator will help ensure that your water pressure is consistent, even as the weather gets cooler and the demand on your system increases.
A tankless water heater. This type of water heater can be a great addition to any home, but it’s especially beneficial in autumn. A tankless water heater will provide hot water on demand without storing it in a tank. This can save you both space and energy.
A quality plunger. A good plunger is always handy, but it’s essential in autumn when leaves and other debris can clog up your drains. Make sure you have a plunger that’s up for the task.
A set of pipe insulation sleeves. Using pipe insulation sleeves is another excellent way to save energy and space in your home. Pipe insulation sleeves can help keep your pipes from freezing in the colder weather.
With these five essential gadgets, you’ll be prepared for anything autumn throws your way!
When you think of plumbers, what comes to mind? Who is your plumber? Like most people, you probably think of someone who unclogs toilets and fixes leaks. But there’s more to plumbing than meets the eye.
Did you know that some of the influential and most famous plumbers in history were responsible for some of the most remarkable engineering feats? Let us tell you about just a few of the most famous plumbers who impacted the world.
George Washington:
Before he was our nation’s first president, George Washington was a master plumber. He designed and built many of the original buildings at Mount Vernon, including the iconic mansion house. He also created and installed the plumbing system still in use today.
Washington was a pioneer in plumbing, and his work laid the foundation for modern plumbing systems.
William Shakespeare:
Before he was a world-renowned playwright, Shakespeare was a plumbing apprentice. He learned the trade from his father, who was also a plumber.
Abraham Lincoln:
Abraham Lincoln was not only known as the 16th president of the United States but also a licensed plumber. He worked as a journeyman plumber before becoming a lawyer and entering politics.
Winston Churchill:
Before becoming the United Kingdom’s Prime Minister, Winston Churchill was a plumbing apprentice. He left the trade after a few years to join the military, but his experience as a plumber would come in handy during his time as Prime Minister.
John F. Kennedy:
John F. Kennedy may have been one of the most famous presidents of the United States, but he was also a plumber. He worked as a journeyman plumber before entering politics and eventually becoming president.
Benjamin Franklin:
Another famous plumber was Benjamin Franklin. Benjamin Franklin is best known for his work as an inventor, but he also made significant contributions to the plumbing field. Franklin invented the Franklin stove, a considerable improvement over traditional fireplaces. He also developed a new type of pipeless likely to leak. Franklin’s innovations helped make plumbing more efficient and reliable.
Lewis Howard Latimer:
Lewis Howard Latimer was another important figure in the history of plumbing. He invented the process of carbon filtration, which is still used today to purify water. He also designed and installed the first indoor plumbing system in a public building. Latimer’s work helped make indoor plumbing more accessible and safe.
George Westinghouse:
George Westinghouse was a famous plumber who made significant contributions to the field of electricity. He invented the alternating current (AC) electrical system, which is still used today. He also developed the first practical incandescent light bulb. Westinghouse’s work helped make electricity more efficient and widely available.
John Roebling:
John Roebling was another famous plumber who made significant contributions to engineering. He designed and built the Brooklyn Bridge, one of the most iconic structures in the United States. He also invented the suspension bridge, which is still used today. Roebling’s work helped make bridge construction more efficient and safe.
JUST FOR FUN! Who is your plumber?
I bet you didn’t know.
Some of the most famous plumbers in the world are Mario, Luigi, and Ozzy Osborne. These guys have unclogged some of the most challenging pipes and fought some of the nastiest bosses, so what else do they have in common?
Let’s take a closer look!
Mario is the quintessential Italian-American plumber. He’s got a strong work ethic, is always ready to help out his friends, and knows how to have a good time. Luigi is Mario’s slightly younger brother. He’s not quite as confident as Mario, but he’s as capable. And then there’s Ozzy Osborne, the heavy metal legend. He might not be a plumber by trade, but he’s unafraid of getting his hands dirty.
These three men have made a name for themselves by being tough, resourceful, and fearless. They’re also all incredibly talented musicians. Mario is known for his catchy theme song, Luigi has some serious pipes, and Ozzy Osborne is, well, Ozzy Osborne.
So there you have it. Three of the most famous plumbers in the world. What do they have in common? They’re all tough, resourceful, and incredibly talented. Oh, and they know how to have a good time. Thanks for reading!
These are just a few of the most famous plumbers in history. These men made significant contributions to the plumbing field and helped shape the modern world as we know it. If you need a plumbing technician, remember these names and their contributions to society.
Who knows, maybe one day you could be added to this list!
https://www.poolesplumbing.com/wp-content/uploads/who-is-your-plumber-scaled.jpg25602149raleigh plumbershttps://www.poolesplumbing.com/assets/Pooles-logos_01_small.pngraleigh plumbers2022-08-16 11:00:352022-11-27 15:13:03Who is your plumber?
Bathroom Water Conservation — Tips Can Help Save On Your Bills While Saving Your Planet
Water Conservation:
In today’s eco-friendly world that we live in, it seems we’re always searching for ways to conserve better. This line of thinking certainly holds true regarding different products, methods, and practices used for plumbing purposes. Consequently, there are many different areas and ways that your plumber can help to be “greener” and earth-friendly. Likewise, there are many instances and actions that you can take to assist in the cause.
So, like most people, you probably don’t think about your plumbing very often. But when something goes wrong with the pipes or fixtures in your home, it can quickly become a top priority. And if you’re dealing with an old house, the plumbing system can be incredibly challenging.
You should know a few critical differences between plumbing in old and new homes. First, the materials used in plumbing have changed over the years. Older homes were often built with lead pipes, while newer homes are more likely to have copper or plastic pipes. This can affect the quality of your water and the speed at which your pipes corrode.
Second, the way that water is distributed has changed as well. In older homes, gravity was often used to move water from one level to another. This meant that the plumbing in an old home was often more complex, with multiple pipes and fixtures needed to supply water to all parts of the house. Today, most homes have a central water supply system that uses pumps to move water where it’s needed. This can simplify the plumbing in your home and make repairs easier.
Following these water conservation tips will help reduce water usage and save money. Conserving water also helps preserve our natural resources for future generations. Every little bit counts, so do your part to protect our planet!
Turn the faucet off while brushing your teeth
Take shorter showers
Fix any leaks in your home
Don’t leave the water run while washing dishes
Use a broom instead of a hose to clean your driveway or sidewalk
Water your plants during the cooler hours of the day
Collect rainwater in a rain barrel for watering plants
Install low-flow showerheads and toilets
Wash only full loads of laundry or dishes
Use recycled water for irrigation or other non-potable uses
Finally, advances in technology have led to more efficient fixtures and appliances. Toilets, for example, use far less water than they did even a few decades ago. This saves water and reduces wear and tears on your plumbing system.
Suppose you’re dealing with an old home, then it’s essential to be aware of these differences. Plumbing repairs can be more challenging in an old house, but understanding the unique challenges can help you get the job done right.
https://www.poolesplumbing.com/wp-content/uploads/sharon-pittaway-N7FtpkC_P7o-unsplash.jpg22001467raleigh plumbershttps://www.poolesplumbing.com/assets/Pooles-logos_01_small.pngraleigh plumbers2022-08-10 13:26:152022-11-27 15:13:03Bathroom Water Conservation
You should never flush facial cleaning wipes, condoms, diapers, cotton swabs, paper towels, or cat poop down the toilet. All these mentioned items can clog your pipes and cause serious plumbing problems. Additionally, these items may not break down properly in septic systems and could cause environmental issues.
Facial cleansing wipes are made of fabric that can quickly clog your pipes. Even if the package says the wipes are “flushable,” they should not be flushed down the toilet.
Condoms are made of latex, which does not break down in the water. When condoms are flushed, they can end up in the ocean, where they can harm marine life.
Diapers contain human waste and should never be flushed down the toilet. They can clog your pipes and cause sewage backup in your home.
Cotton swabs, also known as Q-tips, are made of cotton and plastic. The cotton will absorb water and expand, while the plastic will not break down. This can cause a clog in your pipes.
Paper towels are made of paper and will not break down in the water. When flushed, they can cause a clog in your pipes.
Cat poop may contain harmful bacteria that can spread disease. It should never be flushed down the toilet as it can contaminate your water supply.
All these items listed above should be disposed of in the trash, not flushed down the toilet. Flushing them can cause serious plumbing problems and environmental damage.
https://www.poolesplumbing.com/wp-content/uploads/10-things-you-should-never-flush-down-your-toilet.jpg20202200raleigh plumbershttps://www.poolesplumbing.com/assets/Pooles-logos_01_small.pngraleigh plumbers2022-07-20 17:00:282022-11-27 15:13:0310 Things You Should Never Flush Down Your Toilet:
So, when it comes to your kitchen sink, there are a few things you should never put down the drain. Grease, coffee grounds, and eggshells can all cause serious problems for your plumbing.
Grease may seem like it will wash down the drain, but it can solidify once it hits any cold water in your pipes. This can create a clog that will be very difficult to remove. Coffee grounds can also clog your drains, and eggshells can break up and cause blockages.
So what should you do with all of this waste instead? Grease can be thrown in the trash, coffee grounds can be composted, and eggshells can be added to your compost pile. Following these simple and careful tips, you can keep your drains clear and your plumbing in good working order.
Most people know that certain items, such as grease or food scraps, should not be put down the drain. However, there are other items that many people don’t realize can cause problems when disposed of in this way.
Meat Scraps
When cooking meat, it’s essential to dispose of the scraps properly. Putting them down the sink drain can cause problems in two ways. First, the fat from the meat can solidify and clog your pipes. Second, as the meat decomposes, it can attract pests like flies and rats.
Medication
Never flush medication down the sink or toilet. This can contaminate the water supply and make it difficult for sewage treatment plants to do their job. Instead, dispose of medications safely, such as taking them to a drug take-back program.
Petroleum
Products like gasoline, kerosene and motor oil should never be put down the drain. They can contaminate the water supply and cause fires or explosions. Instead, dispose of them at a hazardous waste facility.
Cigarette Butts
Cigarette butts may seem small, but they can clog up your pipes. Additionally, the chemicals in cigarettes can pollute the water supply. If you’re a smoker, dispose of your cigarette butts in the trash, not the sink.
Following these simple tips can help keep your pipes clean and your water supply safe.
https://www.poolesplumbing.com/wp-content/uploads/10-things-you-should-never-rinse-down-your-sink-scaled.jpg25601707raleigh plumbershttps://www.poolesplumbing.com/assets/Pooles-logos_01_small.pngraleigh plumbers2022-07-20 16:32:302022-11-27 15:13:0310 Things You Should Never Rinse Down Your Sink
There’s nothing quite as frustrating as a plumbing problem in your home. Whether it’s a clogged sink, a leaky faucet, or a toilet that won’t flush, plumbing issues will most certainly and quickly put a damper on your day.
Fortunately, most plumbing problems are relatively easy to fix. This article will look at some of the most common plumbing issues and how to fix them. However, when you are in doubt, call your trusted plumbing company to help alleviate the problem.
Clogged Sinks
So, one of the most common plumbing problems is a clogged sink. If your sink is clogged, the first thing you should do is check the trap for debris. The catch is under the sink and is usually shaped like a P or an S. If there’s debris in the trap, remove it and flush the sink with hot water.
If the trap is clear, but the sink is still clogged, you may need to use a plunger or a plumber’s snake. To use a plunger:
Simply place the toilet plunger over the drain and push and pull it up and down.
Use enough force to create a seal between the plunger and the drain.
Use a rubber plunger rather than a suction cup plunger for best results.
To use a plumber’s snake, insert it into the drain and turn it clockwise. The plumbing snake will travel through the pipes and help to break up any clogs along the way.
Toilets That Won’t Flush
If your toilet won’t flush, the first thing you should do is check the flapper. The toilet’s flapper is located at the bottom of the tank and is responsible for sealing it when it’s not in use. If the flapper on the bathroom is damaged or worn, replace it with a new one.
If the flapper is not damaged, the problem may be with the float. The float is located in the tank and helps to regulate the water level. If the float is too low, it won’t allow enough water into the bowl to flush correctly. Adjust the float until it’s set at the proper level.
If neither of these solutions fixes your toilet, you may need to call a plumber!
Leaky Faucets – Check The Washer
If you have a leaky faucet, the first thing you should do is check the washer. The washer is located under the handle and is usually made of rubber or plastic. If the washer is damaged, replace it with a new one.
The problem may be with the seat if the washer is not damaged. The seat is located under the washer and may be cracked or worn. You may then decide to remove the seat and replace it with a new one.
If neither of these solutions fixes your leaky faucet, you may need to replace the entire faucet.
If you have low water pressure, the first thing you should do is check the shut-off valve. The shut-off valve is located near the water meter and is responsible for regulating the flow of water into your home. If the shut-off valve is turned too low, it will limit the amount of water that flows into your home and cause low water pressure. Turn the shut-off valve clockwise to increase the flow of water.
If the shut-off valve is not the problem, the problem may be with the pipes. If the lines are old or corroded, they may restrict the water flow. To fix this problem, replace the old pipes with new ones.
Wildlife
If you have a squirrel in your drain pipe, you can do a few things to try to get it out. First, pour some boiling water down the line. This will hopefully startle the squirrel and make it climb out. So, If that doesn’t work, you can try using a plunger to create suction and push the squirrel up and out of the pipe. If all else fails, you may need to call a professional to remove the squirrel.
In any case, getting a squirrel out of your drain pipe is not difficult and can be done with patience and perseverance.
https://www.poolesplumbing.com/wp-content/uploads/Common-plumbing-issues.jpg14692200raleigh plumbershttps://www.poolesplumbing.com/assets/Pooles-logos_01_small.pngraleigh plumbers2022-07-11 12:09:122022-11-27 15:13:03Common Plumbing Issues and how to fix them
Had Pooles Plumbing come out to diagnose and fix an intermittent issue with my tankless hot water heater. Everything worked like clockwork! The crew who came out was very knowledgable, professional, quickly diagnosing the likely problem and suggesting a good cleaning first before any more costly repairs. It has been working perfectly so far since their visit. I would definitely use them again!
I had a wonderful experience with Poole's Plumbing. Found a water leak in the line between the meter and my house. They came out promptly and told me everything that needed to happen (cable, gas, sewer lines marked, inspections, etc.). They took care of everything! Everyone with whom I dealt was friendly, professional, knowledgeable, and efficient. And so very neat! I had to have a long trench to lay new pipe, and just a few days later, neighbors are commenting on how you can barely tell I had the work done! They left my yard looking as good or better than when they left! And they alerted me to a potential electrical grounding issue with my home. No one wants the expense of a water main leak, but I feel very good that I had the best people on the job!!
We have been dealing with the headaches of Polybutylene pipes for years, (leaks, burst pipes and lost sleep) but finally bit the bullet on getting the house re-plumbed. We had several quotes and chose Poole's, and we are very happy we did. We were on their schedule within 10 days of selecting them to do the job. Earl and John showed up on time (called before arrival) and explained how they would do the work. Going in we knew they would have to cut away some dry wall in the walls and ceiling to get to the upstairs bathroom plumbing, but I was surprised how small the holes were, they were like surgeons. They used the existing runs, removing the old pipes and putting the new in the same holes where possible.No one wants to spend that much money to fix something that isn't broke at the moment, but I can honestly say this was one of the best decisions we made at our home. We will sleep better knowing the poly is gone, and we made the right decision having Poole's do the work.
From the first call placed to Wendy at Pooles Plumbing to the actual service performed, the entire team delivered 100%. Cory arrived with all parts needed and did a fantastic job repairing the leak on our well water system and installing an isolation valve as asked. I'd definitely recommend Poole's Plumbing based on my experience with them and will be contacting them again when I have more work in the future. Thank you!
Cory did a great job replacing our direct vent tank water heater. There were some space challenges they worked through and couldn't thank them enough for the work they did with minimal disruption to my day. From my initial contact with Wendy, working with Makayla on the quote through completion of the project with Cory, everyone was kind, answered all my questions and provided a great experience overall. I'd definitely recommend Poole's based on my experience with them and will be contacting them again when I have more work in the future. Thank you!
Install sump pump.I also had Poole's replace my water heater yesterday (Feb 2023) and am very happy with their service. Their price was very competitive, and they accommodated my request for prompt service as I had been without hot water for a few days. The installation seems to have been completed in a professional manner.
We used Poole’s Plumbing to have a toilet replaced. Everyone at Poole’s is friendly, efficient and it was a quick turnaround. Our toilet is of high quality too. Will definitely be using Poole’s in the future!
Wonderful experience! Poole's Plumbing is the best and I won't be going anywhere else. Great communication, fair prices, reliable, honest and they know what they're doing!A big shout out to COREY at Poole's! He arrived on time, explained things to me, took care of the issue, and was such a nice guy! Thank you so much.Beth WilsonRaleigh, NC
Henry did a fantastic job installing our tankless hot water heater. He was professional, friendly and did excellent work. Jessica managed the process in the office with great customer service. I highly recommend Poole's Plumbing and will use them again for other plumbing projects.
Exceptional service all around, from my inital conversations for a quote to the eventual replacement of my water heater! They did everything they promised and more! I would definitely recommend Poole's Plumbing to anyone!
Bob Poole and this team we great to work with, on time professional, and did a great job. Highly recommend Poole's PlumbingAnother great response and took care of the problem we were having with out tankless water heater
I had a water flooding due to a water filtering system that a outside plumber installed.I called Pooles to fix it ,they where promote and they helped me with removing the filter system and restore line to how it was when the new house was built.I now feel at ease.Knowing these guys handled it.
First time use of Poole's Plumbing. I live in the Atlanta, GA area. My rental property in Raleigh is occupied with family members. Poole's technician, Kai, was thorough, knowledgeable, and professional. Repairs were within the scope of the work and done well. No surprises. I highly recommend this company.
I have used Poole's plumbing for installation of our tankless water heater, and later for its maintenance and repair. The water heater later failed on a Saturday morning over a holiday weekend. The on-call technician quickly responded and had the system up and running by the afternoon.Most recently, Poole Plumbing installed a toilet and replaced a broken faucet in my laundry room. Again, they did a great job.I find them to be very responsive and professional with reasonable pricing for the services. They are my plumber of choice!
I had a great experience with Poole's plumbing when they came to replace the gas pipe connecting my house to the meter. They were on time, had fair pricing, and were extremely professional. Bill, Henry, Cody, and Dylan worked together from giving me a free estimate, installing the pipe, and then meeting the city inspector all in a timely fashion. Makayla and Jessica were extremely helpful on the phone with scheduling and questions about billing and my quote. I cannot recommend this company enough!!
Keith removed my old toilet and put in the new one in less than an hour. Looks great! I recommend Poole's plumbing to all my friends! They use them now too! I can't say enough about how professional and responsive the whole team is, from my call to the service! Great job guys!
There staff are very professional and not trying to sell you things you do not need. They diagnose the problem and give you various options to take care of it.
Had a new sink and faucet to be installed in a new kitchen cabinet. The Marketing and Sales Coordinator provided a quote in a timely manner. The Service Coordinator worked with my schedule to provide a service time.The Plumbers did a great job in replacing the water pipe connections to the faucet and sink along with the pipe connection to the dishwasher. The replaced PVC drain line and vent under kitchen cabinet
We had an intermittent water leak that we had not been able to isolate. Unfortunately, it got much worse on a Friday night and we needed help. Henry with Poole's was very professional and polite. We got the job done quickly and with minimal mess. Will use again.
We had a break in our water line that was on our side of the meter so it was our responsibility. Pooles Plumbing was so helpful, Jessica is so knowledgeable, professional, and very kind as well. It was fixed in good time and Keith and his partner were just wonderful. Thank you for quick and thorough action.
We ordered the Tank-less water heater maintenance service -Descaling & Flushing. Mr. Earl performed the excellent service and ran extra miles to check my bathroom's water flow. He detected the possible problems and fixed it. Now, I can enjoy my hot water shower without any interruptions. Thanks! Earl! for your services!
I had a problem with a toilet line stopped up. Carrie was so helpful in getting help to me quickly. She also scheduled several more follow-up that needed to be done. She could see how anxious I was about this. and went out f her way to reassure me that they would take care of this problem. Coery came and did a great job. I appreciate all they did for me.
We have used Poole's Plumbing for several of our managed properties as well as our residence. Poole's Plumbing staff and technicians are professional and friendly. Highly recommended!
We had two aging original water heaters, one electric and one direct vent gas that needed replacing. Pooles was one of three places that I got quotes from and their quoting rep, Bill, immediately impressed me with his attention to detail and knowledge of what my options were. Bill took measurements inside and out and talked about the exact process for similar replacements or a switch to tankless. In our case, I decided that it made the most sense to convert to tankless and it was clear that they were pros at doing that conversion. The quote also came in the lowest which was a great bonus, but since this is critical house infrastructure I was weighing the decision more on the expertise exhibited at the quoting stage.When it came time for the install, the techs Henry and Dylan did a fantastic and expert job. They mounted the new unit to the wall, plumbed in a dedicated gas line from the outside meter and very cleanly and neatly plumbed the unit in with our existing water lines and recirculation system. All of the visible hot lines were insulated for efficiency and you can almost not tell we used to have tanks. The before and after photos speak for themselves. They were done in a day and the inspector had no concerns whatsoever. VERY satisfied customer here! Thanks Poole's!
I was very impressed with their quote process, price, timeliness of scheduling, arrival time, professionalism, and work. I would recommend them and will use them again.
I was having some issues with my Rinnai water heater, and noticed that on the Poole's Plumbing trucks in front of me in traffic, it said they worked on Rinnai water heaters in particular, so I gave them a call.The two young men they sent were courteous, polite and knew their trade. They cleaned up my old Rinnai and asked me to let them know if the issue persisted, though they seemed confident it wouldn't.So far, so good.I'll be calling these guys back for anything else I run into plumbing-wise.
We are exceptionally pleased with Poole's Plumbing -- the people and process.From the initial call to Poole's thru the thorough estimate, timely and efficient install, and follow-up to ensure our satisfaction and rebates, we were very impressed with the courtesy and efficiency of all concerned. They offered us the best product and price, as well as the most prompt install to meet our needs. They delivered as advertised and promised.We have continued to use Poole's for new fixtures, outside faucet replacement, etc. and they continue to be prompt, courteous, professional, and helpful with options and insight. Poole's is pour first choice for nay and all plumbing and general service needs,We most definitely recommend Poole's to our friends and family.
Contacted Poole's Plumbing via their website. Asked for an estimate to replace our hot water tank. Process was simple and easy. Poole's contacted us and provided a solid quote with a good product. Installers were prompt, professional, and completed the job in a timely manner. Great job all around and will use again in the future. As a DIY'r, I am very pleased with price and workmanship.
We recently moved to the area and needed a day’s work of plumbing tasks completed from installation of faucets and toilets to replacement of our shut-off valve. It was obvious that when the person came out to do the estimate, we had the right company. From the estimate to the end of the work, we were impressed with the knowledge, skills, and professionalism. We wouldn’t hesitate to use Poole’s again. Thank you!
Called Poole’s for a couple issues and they managed to come out and fix everything same day. Both Tim and the entire team were great. Would highly recommend! Thank y’all!